 This post gets a lot of attention, so I rewrote part of it. It will give you step-by-step instructions to take all your old email (in my case over 10 years worth) and upload it into Gmail. Over the years I have used several different email clients: Pine on Unix, Outlook, Lotus Notes, Yahoo Mail, and Gmail. I am currently pretty comfortable with Gmail and have been using it since it was released. Like many people I am a data pack-rat and have kept all my email files (well, almost all – sadly I discovered a 6 months gap). My vision is to put it all into Gmail so I can leverage the great search and tagging features they provide. So here are the steps.
Overall Strategy – get everything converted and loaded into a local server, then sync it to Google.
Why do it this way? There are many advantages. First, if your just moving 100 to a 1000 messages with no attachments, then you can just skip all this and use the IMAP interface found in Google’s FAQ. That method allows you to “see†you gmail account in outlook (or thunderbird or lotus notes) and then just drag or copy messages from one box to the other. But if your moving more than 1000 messages (or in my case 20,000 messages) with lots of attachments, that will take you days, and you have to sit there are watch it because you can only move about 200 messages at a time. In this method, we consolidate first to a local email server (I’ll show you how to set it up below) running on pc, then let the two accounts (your local one and gmail) sync on their own. Any other way and you are stuck sitting there, dragging and dropping or copying and pasting 200 messages at a time from one folder to another. Second – this keeps all dates in tact. It is really nice to see message you send in 1995 in your Gmail account. Third, once we do this, we can use it as a local backup of our Gmail – just incase the unthinkable happens to Gmail. (I said don’t think of it!)
Ready? Let’s get started
Here is the over all process – you will notice that I installed a email server on my computer called Mercury. This allows us to set up a IMAP and POP account locally that is much faster and will serve as a local backup of all email.

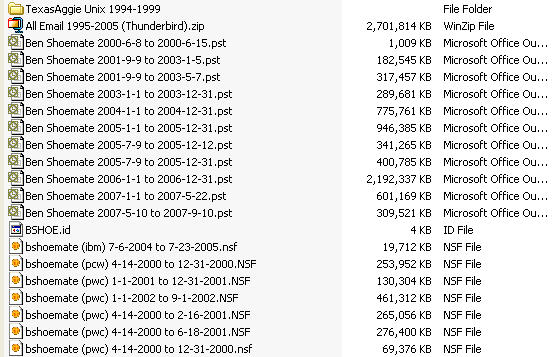
Step 1) First find all your email
I dug through all my old hard drives and consolidate my mail into one location. As you can see, I have outlook (pst) files, lotus notes (nsf) files and files from an old Unix (pine) account I had at school. The zip file (all 2.7GB of it) is the finished product – all my email from 1995 though 2005 (2006 and 2007 are in gmail already).
If you are looking at my files, you see a lot of overlap, that’s ok, better safe than sorry…we can delete the duplicates once they are in Thunderbird using an extension.
Step 2. Download the Software
- Thunderbird (free email client) – http://www.mozilla.com/en-US/thunderbird/
- Mercury (free email server) – ftp://ftp.usm.maine.edu/pegasus/mercury32/m32-452.exe (read about it)
- Lotus Notes (free trial) – http://www.ibm.com/developerworks/lotus/downloads/
- Outlook (free trial) – http://office.microsoft.com/en-us/outlook/default.aspx
Why Thunderbird – because it is open source with a large developer base. This means there is a good set of tutorials for writing extensions if I to want later on (for those visualizations). Also, I’m making a long term bet that 50 years from now, there will still be tools that import these files – (since they are just text files with no encoding and no database) – plus Thunderbird is really fast and can read 6gb of email quickly (lotus notes and outlook tend to slow down). So Thunderbird will be the final destination on my computer and I will upload from there.
Step 3. Install the software
- Thunderbird – just default everything
- Mercury – Make sure you set it up for both POP and IMAP when you get those options in the wizard
- Lotus Notes – Default
- Outlook – Default
Step 4. Import Unix files to Thunderbird
These are the easiest because Thunderbird will read these natively. All you have to do is copy the files in to the local folder and reopen Thunderbird.
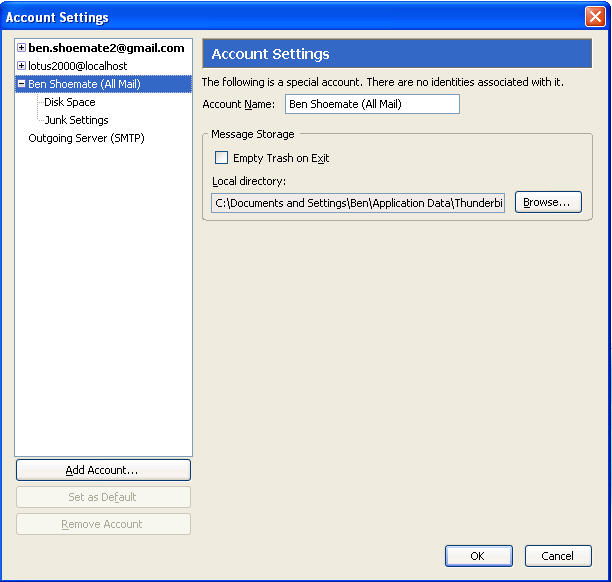
A) Find out where thunderbird is storing your local files. To do this go to Tools > Account Settings. (note I renamed the local account to Ben Shoemate (all mail) but what your interested in is the “Local Directory” copy that and go there in windows explorer. This is where you need to copy the Unix files (they are files with no extensions). Just copy them to this “local folder”, close and restart Thunderbird. Your old mail will be there! That’s it!
Step 5. Set up a local Email account in Mercury.
Open Mercury – if it is all ready running you will see down in the windows toolbar by the clock.
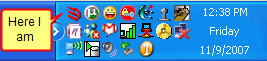
Otherwise , Start > Program Files > etc..
Once Mercury is open, go to Configuration > Manage Local Users > Add User
Because there is so much mail, I am going to set up a different local account per year. Gmail.com can import from 5 accounts at a time, and this will save a lot of time later on. So just make up an account name – I use my initials and the year and a simple password.
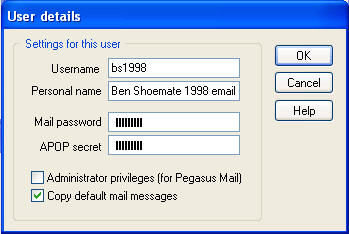
It should look like this when your done.

Each of these accounts are real email addresses. When you are local (in lotus notes and outlook) you can map to them with bs1999@localhost
In gmail, you can add them as bs1999@youripaddress (i.e. bs1999@111.111.122.11).
Step 6. Lotus Notes NSF files to your local email with IMAP
Once lotus notes is installed, you can simply double click the nsf files to open them, or you can click File > Database > Open > browse
You should see your old mail now. Ahh the memories….But don’t stop to read everything again or I’ll never finish this tutorial! Now, in lotus notes we are going to map to the local email account you set up in mercury. (Note: Gmail now has IMAP so you could just map directly to gmail if you want using the same procedure – but again, it will take a 100 years if you have this much email).
Go to File > Preferences > Client Reconfiguration Wizard
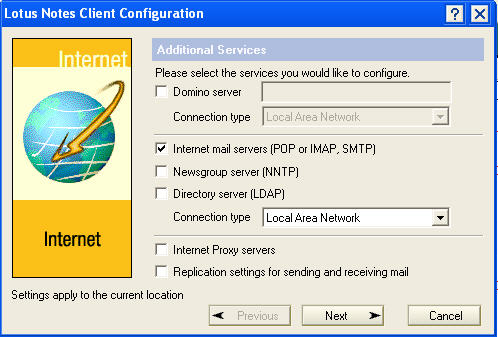
Check Pop or IMAP and click next.
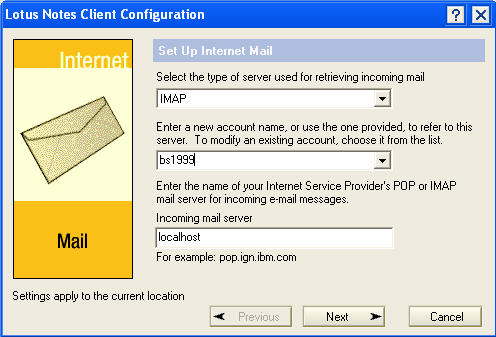
Select IMAP, enter your new email account you set up in mercury, and type localhost, click next.
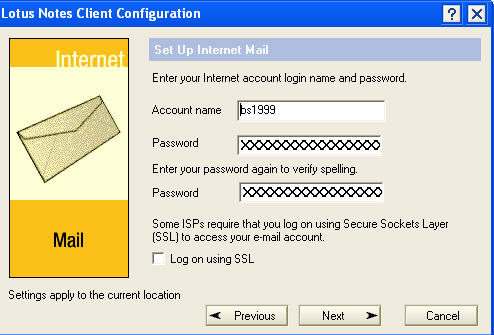
enter your account name again, and enter the password you gave yourself.
Click next, enter localhost as the server and your email address again – this doesn’t matter since you will not be using this email address for very long and it won’t show up on any of the mail that goes through it.
next, next, next your done.
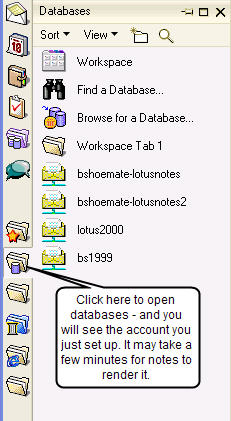
To open the view of this in notes, click the “Databases” icon on the left panel and open your new account (this might take 2-3 minutes while notes creates a new nsf file etc.)
Now you should have you local account open. Now simply open the old nsf file, go to the “all documents” folder, select all, copy (I think it will only let you copy 2500 at a time) and then switch to you new email account and paste. Once you have all the messages for that year in the local IMAP account, close the nsf and repeat for all nsf files, and all years.
Step 7 – Outlook to your local email with IMAP
The same as in lotus notes – open your pst, then add the imap account and copy and paste.
- To open the pst go to File > Manage Data files and click Add.
- To open the local IMAP account go to Tools > Account Settings > New email account
Check the box that says “Manually configure server settings”.
- Select Internet Mail
- Enter your Name, Email address (bs1999@localhost) and password, select IMAP, the server is localhost for both incoming and outgoing
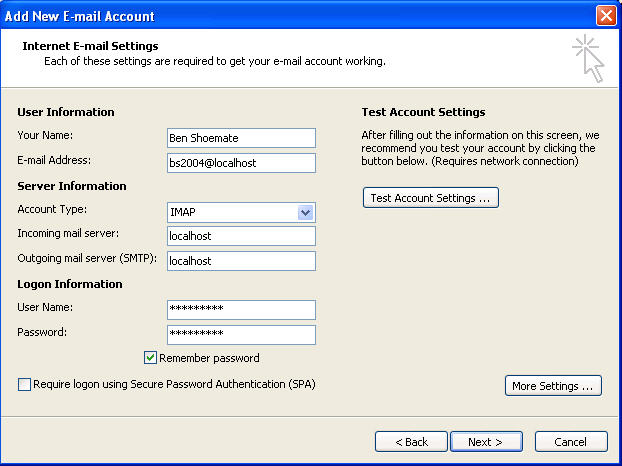
Once you have mapped to this account, simply copy your old mail from the PST to the new account.
Step 8 – Clean it up in Thunderbird
Connect Thunderbird to you local email server (mercury) and download all your mail. Just like in outlook and lotus notes, we are going to add an account to Thunderbird and let it download all the mail you just put into it from lotus notes, pine and outlook.
- Open Thunderbird
- Click Tools > Account Settings > Add Account
- Enter Account Name (for me its bs1999@localhost), Name, email address (bs1999@localhost)
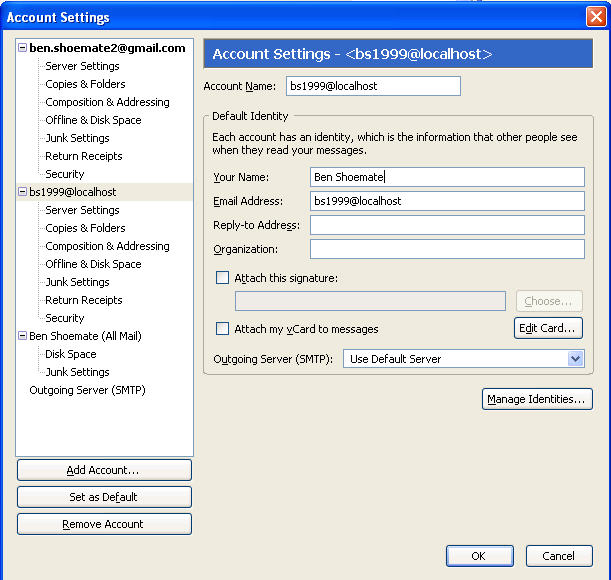
- Click Server settings
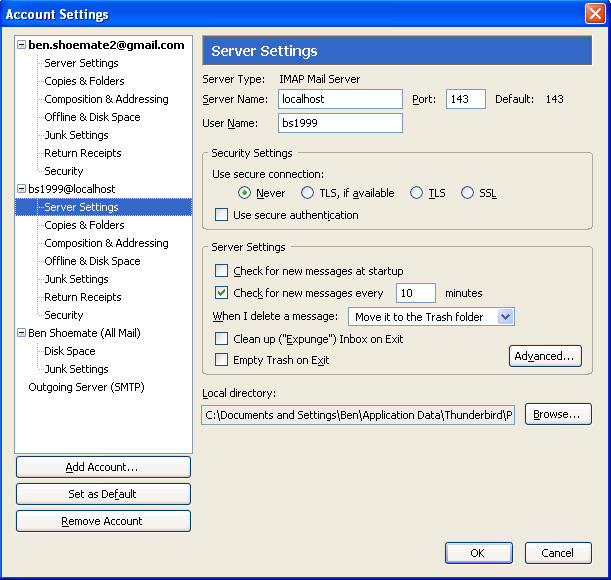
- Click OK.
- The next thing I did was organize copy them down into my local Thunderbird account and used an extension to delete duplicates
- Then I spent some time looking for gaps…oh well
Step 9 – Upload to gmail
By now your local account has a lot of mail. Let’s start pulling it into gmail. I set up a new gmail account to test it first. From there I can pull it into my main account.
- Log in to gmail
- Click Settings > Accounts > Get Mail from other accounts (Pop3) > Add other accounts
- Add your accounts from your local account. Note: you need you IP address. If you have a router you will need to route ports for pop3 (port 110) to your local computer. Log into your router to do this. While your there, get the IP of your router (ITS NOT the one that starts with 192. or 10. those are always local addresses)
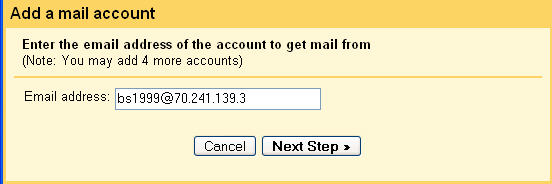
(that’s NOT my IP address btw)
Next – gmail gives you some great options to tag the mail as it comes in, do it. Even if your not a tagger – do it.
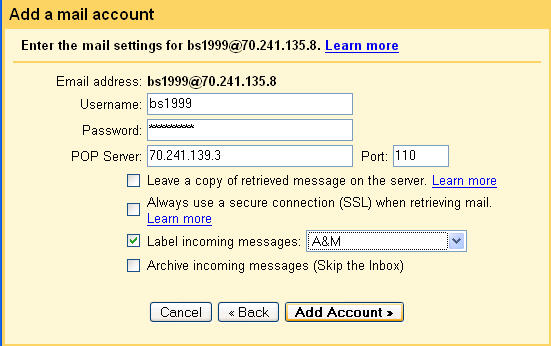
You might also want to leave the message on the server (your computer) if this is a trial run.
Click Add account. If you get a problem, make sure your firewall is open, you port is mapped, and your password is right.
Next I’ll show you how to upload all those old chats…
If you liked this post, check out my other greatest hits:

online casino ohne software…
no deposit required casino cirrus redeem coupon june 2010…
soma cream for men…
information about the drug soma…
valtrex instructions…
valtrex herpes suppression…
how much valtrex is too much…
valtrex 500 mg price…
viagra alternatives injections…
order viagra online uk…
buy generic soma no prescription…
order soma canada…
drug more soma use…
effects side soma…
buy valtrex uk…
valtrex ingredients…
cheap soma generic…
generic soma and generic drug…
viagra dose 200 mg…
viagra pfizer online…
valtrex and kidney problems…
generic valtrex cost…
tramal tramadol hydrochloride cancer drug…
tramadol compared to lortab…
new slots 2010…
new no deposit bonus for coolcat casino…
valtrex in first trimester…
valtrex valacyclovir hcl…
rtg sites instant play…
casino check e online…
rtg coupons redeem free money codes…
free slots at casino…
cost low tramadol…
generic tramadol from india…
casino online juego…
casino en ligne classement…
cirrus casino coupon…
jackpot capitol casino…
viagra brands in india…
no prescription viagra virginia…
instant money free…
free slots no download instant play…
casino online italiani autorizzati…
slimslots…
free casino money to play…
casino en ligne comparatif…
soma for sale cheap…
soma for sale cheap…
half life of tramadol…
tramadol er tablets…
non prescription viagra substitute…
how to get non prescription viagra…
super slots free money…
freeonlineslots nodownload…
buy generic valtrex online…
valtrex vs famvir…
spin2win carnival…
frre cash online casino…
no deposit us bingo promos…
best casino game to play…
viagra temporary…
where to buy generic viagra online without a prescription…
redeem no deposit 2010…
us online casino with $20 minimum…
jackpot download…
play run on line…
rtg casino free money…
cool cat rtg codes august 2010…
partypoker free trial…
superslots flash casinofree…
online casino check…
cirrus casino coupon no deposit…
no deposit casino bonus free…
sms gratis…
tramadol for rheumatoid arthritis…
buy tramadol e-check…
generic mexican online over pharmacy phone soma…
order soma online by fedex…
super jackpot party slot machine…
no deposit bonus blog free casino cash promotioncod…
viagra discussions + supplements…
viagra ppt…
slots casino…
free casino nodowning with bonus…
spintop coupon…
roulette $5 deposit…
online casino that can play in usa ny…
play twice the honey casino game on-line…
7sultans 50 free promotion code…
online casino neu…
the best area to play in the casino…
unlimited mighty slots casino play…
online casinos hot hot super jackpot…
7sultans promo codes…
book buy online tramadol viscacha…
tramadol chemical mechanism…
vega viagra…
elizashear2…
effects of soma…
soma for sale uk…
valtrex generic available…
valtrex recommended dosage…
valtrex and liver…
valtrex in canada…
valtrex for shingles…
what is valtrex 500 mg…
gsk valtrex coupon…
when did generic valtrex become available…
vip longe coupon bonus code…
slotgames…
prescription viagra in england…
no prescription viagra kamloops…
order tramadol overnight in florida…
ultram and tramadol mg…
no presciption soma…
no presciption soma…
lasvegascasinofree…
casino buses from central texas…
buy online viagra in england…
online sales viagra…
canine tramadol dose…
tramadol several online…
soma 6 free samples…
aan agcode soma…
new york new york casino vegas…
casino free money play…
drug female new soma…
flexeril soma…
generic viagra manufacturers…
viagra customer reviews…
viagra bigger…
viagra off the shelf…
generic overnight shipping soma…
cheap soma cash on delivery…
poker code to 10 dollar…
fun free on line pokies no download…
tramadol affiliate…
buy tramadol 00…
cheap man soma…
gerneric soma…
valtrex treatment cold sores…
generic valtrex effectiveness…
freecasinomoney…
kasyno online kasa na start…
ti – treasure island hotel and casino trypadvisor…
promotion code sultans…
i need free codes for online casinos…
kasyno online polskie…
valtrex treat shingles…
can i take valtrex while nursing…
spintop coupon…
bingo casino play game online free…
casino games not played on enternet…
no deposit us bingo promos…
freeonlineslots instant play…
casino en ligne 777…
free chat uk no regitration…
casino bonus codes no deposite…
casino bus promotions to atlantic city…
kasyno online forum…
tramadol fiddler online…
tramadol interaction hydrocodone…
borgata hotel casino atlantic city…
real casino games played online for free…
cool cat rtg codes august 2010…
jackpots party slot…
golden moon casino…
online casinos with a 10 deposit min…
sign up for free blog…
sign up for free blog…
online casinos with progressive play…
gamebonus coupon code…
no cash down free online slots…
2010 casinomaster usa no deposit codes…
redeem coupons for bodog…
best southern california casinos…
scratch no deposit bonus 5$…
frre online casino games…
tramadol cod 50 states…
vetranarian tramadol…
no deoposit free spin casino…
free casino games slots machines…
free cool cats slot machines…
online casino unter 18…
flamingo casino in las vegas…
internet casino directory…
free cash no deposit roulette ladyluck…
casino free bonus code no deposit…
bonus bingo no deposit…
casino deposit no promotion…
soma prescription from doctors online…
soma and overnight…
aria resort & casino at citycenter…
casino en ligne sans telechargement gratuit…
lucky nugget coupons and codes…
free play online casino…
is valtrex safe…
valtrex with no prescription…
new no deposit bonus casinos…
usa accepted no deposit bingo bonus codes…